ESP32-C5 CYD: NM-CYD-C5 & ESP-Claw
Use C5-specific firmware and display libraries, with NM-CYD-C5 pin and expansion references.
On this page
Identify the C5 display boardESP-Claw quick startArduino setup for ESP32-C5NM-CYD-C5 reference pinsDisplay test and touch verificationNM-RF-HAT expansionFirmware upload and recoveryTroubleshootingDocumentation sources and downloads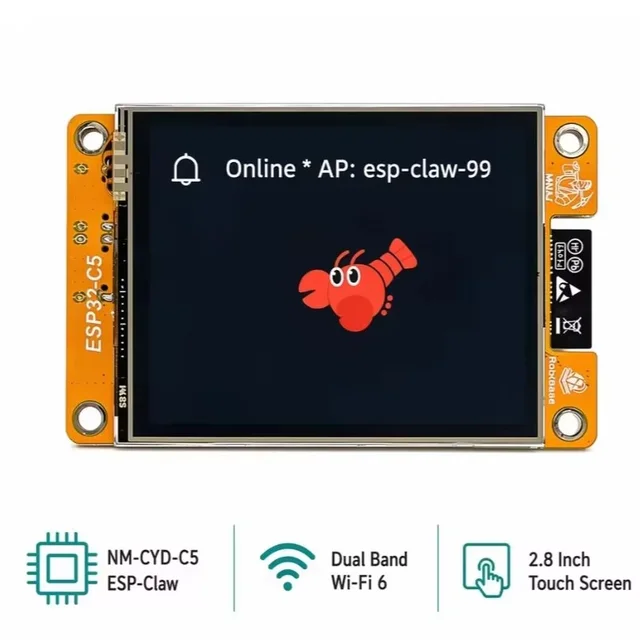
Identify the C5 display board
This product is listed as an ESP32-C5 2.8-inch board with 16 MB flash and 8 MB PSRAM. The hardware reference in this guide is RockBase NM-CYD-C5; verify that name and your board revision before applying its pins.
| Reference feature | NM-CYD-C5 |
|---|---|
| MCU | ESP32-C5 |
| Display | 240 × 320 TFT (320 × 240 in landscape) |
| Touch | Resistive |
| Memory | 16 MB flash / 8 MB PSRAM |
| Wireless hardware | Dual-band 2.4/5 GHz Wi-Fi 6, BLE, IEEE 802.15.4 |
| USB | Native USB-C and CH340 USB-to-UART USB-C |
Matching the classic CYD dimensions does not make its compiled ESP32 firmware compatible with an ESP32-C5. Check the target chip and board build.
ESP-Claw quick start
For the NM-CYD-C5 reference, open the manufacturer web flasher in a supported desktop browser. Choose the nm-cyd-c5 device and a release explicitly supporting it. Connect the programming USB interface, select its serial port and follow the flashing prompts.
After reboot, use the provisioning steps for the selected firmware release. Configure your Wi-Fi and AI-provider settings through its setup interface, then test a simple status or display interaction. Radio features advertised by the hardware depend on the installed application.
Espressif ESP-Claw project contains the current project documentation; use its instructions for accounts, channels and network provisioning rather than an old default address.
Arduino setup for ESP32-C5
The manufacturer Arduino guide specifies Arduino-ESP32 3.3.5 or newer with C5 support and the ESP32C5 Dev Module target. Install TFT_eSPI and XPT2046_Touchscreen for its Arduino demos.
Use the manufacturer’s C5-adapted TFT_eSPI files from the linked Demos folder. Its instructions require C5 processor support and target guards, so installing a stock library and changing only User_Setup.h may not be enough. Keep the supplied library and demo versions together.
NM-CYD-C5 reference pins
| Function | GPIO / bus |
|---|---|
| SPI clock / MISO / MOSI | 6 / 2 / 7 |
| LCD CS / DC / backlight | 23 / 24 / 25 |
| Touch CS | 1 (shared SPI) |
| SD card CS | 10 (shared SPI) |
| WS2812 LED | 27 |
| I²C header IO | 8 and 9; confirm SDA/SCL in the application |
The manufacturer documents ST7789 as the default LCD driver and also mentions ILI9341 configurations. Select the driver for your board, not the one used by an older CYD sketch.
Display test and touch verification
Once the C5 library and correct panel setup are in place, this original minimal sketch checks display initialization without adding peripherals.
#include <TFT_eSPI.h>
TFT_eSPI screen;
void setup() {
  Serial.begin(115200);
  screen.init();
  screen.setRotation(1);
  screen.fillScreen(TFT_BLACK);
  screen.setTextColor(TFT_WHITE, TFT_BLACK);
  screen.setCursor(12, 20);
  screen.println("ESP32S display test");
}
void loop() { delay(1000); }
Use the manufacturer touch example next. The reference display, touch and SD share SPI lines with separate chip-selects; retain the demo’s transaction and chip-select handling.
NM-RF-HAT expansion
Before attaching an expansion, compare the HAT revision and connector orientation with the NM-RF-HAT hardware documentation. Disconnect power while installing it. Choose firmware explicitly supporting the C5 board and the fitted modules; HAT availability does not mean every radio function is included in the supplied package.
Firmware upload and recovery
Prefer the project upload command, which uses its generated bootloader, partition table and application layout. For a downloaded binary, follow the release manifest rather than assuming an offset or reusing another board’s firmware.
If connection fails, lower upload speed, close other serial programs and follow the board’s BOOT/RESET procedure. After reset, read the serial log before changing display settings. See the firmware flashing guide.
Troubleshooting
| Symptom | Next check |
|---|---|
| Backlight on, screen blank | Check controller, board profile and display interface before editing application code. |
| Image shifted or unstable | For RGB panels, verify timing and memory settings from the selected profile. |
| Touch does not respond | Check the touch variant and controller independently of the display. |
| Build fails after updating libraries | Restore the project’s pinned dependencies and matching LVGL major version. |
| Upload succeeds but board resets | Read the exception log and confirm target chip, flash layout and PSRAM settings. |
Documentation sources and downloads
- Manufacturer setup
- NM-CYD-C5 hardware and files
- Arduino instructions
- Manufacturer demo folder
- Firmware installer
- ESP-Claw source
References checked October 14, 2026. Board definitions document specific reference hardware; verify the revision on your board. These instructions have not been bench-tested on your individual unit.
Share the product link, hardware revision, software version and any error messages.
Contact ESP32S support →