
EMC/EMI Checklist Before Your Board Goes to Certification
EMC testing is expensive, and failing it is worse than the test fee — it costs you a respin, a
Imagine having multiple ESP32 sensor nodes scattered around your home or workshop, all wirelessly sending temperature and humidity data to a single, sleek touchscreen display that shows everything in real-time. With the ESP32 Cheap Yellow Display (CYD) and ESP-NOW communication protocol, you can build exactly that—no Wi-Fi router required.
In this project, you'll learn how to receive and display data from multiple ESP32 sender boards on your CYD, organizing the information in separate tabs for each device. This is the perfect foundation for creating wireless environmental monitoring systems, remote sensors networks, or any multi-point data logging project.
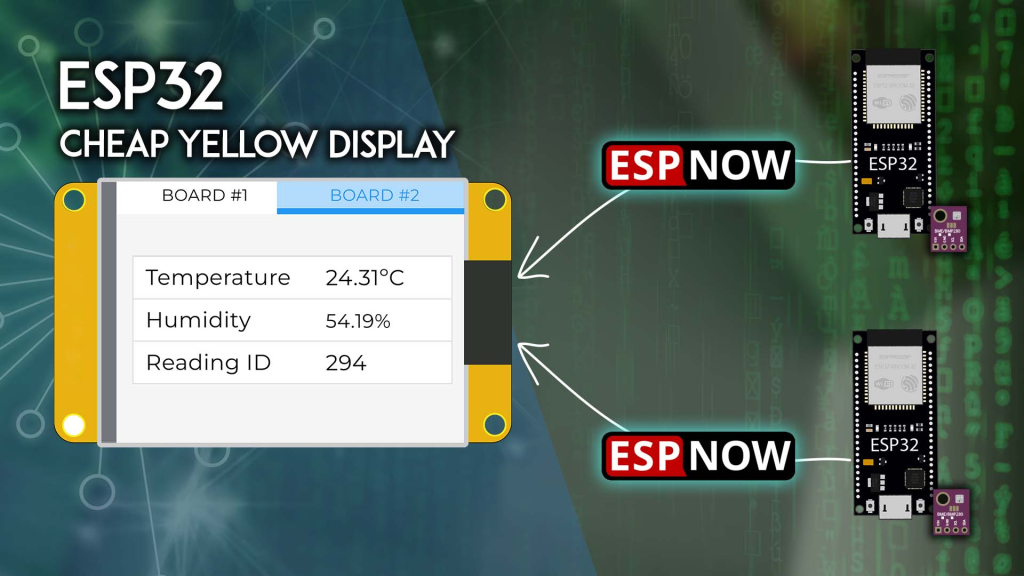
Before diving into code, let's understand the system architecture:
┌─────────────────┐     ┌─────────────────────────────────────────┐
│  ESP32 Sender 1 │────▶│                                         │
│  (with BME280)  │     │            ESP32 CYD                    │
└─────────────────┘     │         (ESP-NOW Receiver)              │
                        │  ┌─────────────────────────────────┐    │
┌─────────────────┐     │  │  Tab 1: Board 1 Data            │    │
│  ESP32 Sender 2 │────▶│  │  Temperature: 23.5°C            │    │
│  (with BME280)  │     │  │  Humidity:     65%              │    │
└─────────────────┘     │  ├─────────────────────────────────┤    │
                        │  │  Tab 2: Board 2 Data            │    │
                        │  │  Temperature: 24.1°C            │    │
                        │  │  Humidity:     58%              │    │
                        │  └─────────────────────────────────┘    │
                        └─────────────────────────────────────────┘
Two ESP32 sender boards each read data from a BME280 environmental sensor
They send this data via ESP-NOW—a connectionless protocol that requires no Wi-Fi network
The ESP32 CYD board acts as the receiver, listening for incoming data packets
The CYD displays the data in a tabbed interface, with separate tables for each sender
Data updates automatically whenever new readings arrive
ESP-NOW is ideal for this application because it's fast, low-power, and works even when Wi-Fi networks are unavailable. Each sender can be placed anywhere within range (typically 30-50 meters indoors) and send data directly to the CYD.
To build this project, gather the following components:
| Component | Quantity | Purpose |
|---|---|---|
| ESP32 Cheap Yellow Display (CYD) | 1 | Main receiver with touchscreen (Check price) |
| ESP32 development board (any model) | 2 | Sender nodes (ESP32 options) |
| BME280 sensor module | 2 | Measures temperature & humidity (BME280 sensors) |
| Jumper wires | As needed | For connecting sensors to sender boards |
| USB cables | 3 | For programming all boards |
👉 Find all these parts at the best prices here
Before starting, ensure you've completed these essential setup steps. Missing any will cause compilation errors.
If you haven't already, install ESP32 board support in Arduino IDE. Follow our detailed guide: Installing ESP32 Board in Arduino IDE.
The ESP32 Cheap Yellow Display (ESP32-2432S028R) is the heart of this project. If this is your first time using it, complete our Getting Started with ESP32 CYD guide first. You'll need to:
Install the TFT_eSPI library
Configure the User_Setup.h file correctly
Test basic display and touch functionality
We'll use LVGL (Light and Versatile Graphics Library) to create the tabbed interface. Follow our dedicated tutorial to install and configure LVGL for the CYD:
👉 LVGL with ESP32 Cheap Yellow Display
For the sender boards, install the Adafruit BME280 library:
In Arduino IDE, go to Sketch > Include Library > Manage Libraries
Search for "Adafruit BME280" and install the latest version
Install any required dependencies (Adafruit Bus IO, Adafruit Unified Sensor)
ESP-NOW is a proprietary protocol from Espressif that allows multiple devices to communicate without Wi-Fi. If you're new to it, read our Getting Started with ESP-NOW tutorial.
ESP-NOW uses MAC addresses to identify devices. First, you need the MAC address of your CYD receiver so the sender boards know where to send data.
Upload this simple sketch to your CYD:
#include <WiFi.h>
#include <esp_wifi.h>

void readMacAddress() {
  uint8_t baseMac[6];
  esp_err_t ret = esp_wifi_get_mac(WIFI_IF_STA, baseMac);
  if (ret == ESP_OK) {
    Serial.printf("CYD MAC Address: %02x:%02x:%02x:%02x:%02x:%02x\n",
                  baseMac[0], baseMac[1], baseMac[2],
                  baseMac[3], baseMac[4], baseMac[5]);
  } else {
    Serial.println("Failed to read MAC address");
  }
}

void setup() {
  Serial.begin(115200);
  WiFi.mode(WIFI_STA);
  WiFi.STA.begin();
  delay(100);
  readMacAddress();
}

void loop() {}
After uploading, open the Serial Monitor at 115200 baud and press the reset button. You'll see output like:
CYD MAC Address: 24:dc:c3:49:6a:14
Write this address down—you'll need it for each sender board.
Now, let's set up the two ESP32 boards that will send sensor data. Each board gets a unique ID and a BME280 sensor.
Connect the BME280 sensor to your ESP32 sender board using the default I2C pins:
| BME280 Pin | ESP32 Pin |
|---|---|
| VCC | 3.3V |
| GND | GND |
| SCL | GPIO 22 |
| SDA | GPIO 21 |
(If your ESP32 board uses different default I2C pins, adjust accordingly.)
Each sender board runs identical code, except for the BOARD_ID and the receiver MAC address. Here's the complete sender sketch:
/*********
  ESP32 ESP-NOW Sender with BME280
  Sends temperature and humidity to CYD receiver
  Complete project: https://RandomNerdTutorials.com/esp32-cyd-esp-now-receive-data/
*********/
#include <esp_now.h>
#include <WiFi.h>
#include <Adafruit_BME280.h>
#include <Adafruit_Sensor.h>

// IMPORTANT: Set unique ID for each sender (1, 2, 3...)
#define BOARD_ID 1   // Change to 2 for second board

Adafruit_BME280 bme;

// REPLACE WITH YOUR CYD'S MAC ADDRESS (from Step 1)
uint8_t broadcastAddress[] = {0x24, 0xDC, 0xC3, 0x49, 0x6A, 0x14};

// Data structure (must match receiver)
typedef struct struct_message {
  int id;
  float temp;
  float hum;
  int readingId;
} struct_message;

struct_message myData;
unsigned long previousMillis = 0;
const long interval = 10000;  // Send every 10 seconds
unsigned int readingId = 0;

void initBME() {
  if (!bme.begin(0x76)) {
    Serial.println("BME280 not found! Check wiring.");
    while (1);
  }
  Serial.println("BME280 initialized");
}

float readTemperature() {
  return bme.readTemperature();
}

float readHumidity() {
  return bme.readHumidity();
}

esp_now_peer_info_t peerInfo;

void OnDataSent(const uint8_t *mac_addr, esp_now_send_status_t status) {
  Serial.print("Send status: ");
  Serial.println(status == ESP_NOW_SEND_SUCCESS ? "Success" : "Fail");
}

void setup() {
  Serial.begin(115200);
  initBME();

  WiFi.mode(WIFI_STA);

  if (esp_now_init() != ESP_OK) {
    Serial.println("ESP-NOW init failed");
    return;
  }

  esp_now_register_send_cb(OnDataSent);

  memcpy(peerInfo.peer_addr, broadcastAddress, 6);
  peerInfo.channel = 0;
  peerInfo.encrypt = false;

  if (esp_now_add_peer(&peerInfo) != ESP_OK) {
    Serial.println("Failed to add peer");
    return;
  }
  Serial.println("ESP-NOW ready. Sending data every 10 seconds...");
}

void loop() {
  unsigned long currentMillis = millis();
  if (currentMillis - previousMillis >= interval) {
    previousMillis = currentMillis;

    myData.id = BOARD_ID;
    myData.temp = readTemperature();
    myData.hum = readHumidity();
    myData.readingId = readingId++;

    esp_err_t result = esp_now_send(broadcastAddress, (uint8_t *)&myData, sizeof(myData));

    Serial.print("Sending [ID:");
    Serial.print(myData.id);
    Serial.print("] Temp:");
    Serial.print(myData.temp);
    Serial.print("C Hum:");
    Serial.print(myData.hum);
    Serial.print("% Reading:");
    Serial.print(myData.readingId);
    Serial.print(" - ");
    Serial.println(result == ESP_OK ? "OK" : "FAILED");
  }
}
Important modifications for each sender:
Board 1: Set #define BOARD_ID 1
Board 2: Set #define BOARD_ID 2
Both: Replace the broadcastAddress array with your CYD's actual MAC address
Upload this code to both ESP32 sender boards after wiring the BME280 sensors.
Now for the star of the show—the CYD receiver that displays all incoming data in a beautiful tabbed interface. This code uses LVGL 9.2 to create two tabs (one for each sender) with tables showing temperature and humidity.
Before uploading, ensure you've:
Installed LVGL version 9.2 via Library Manager
Placed the correct lv_conf.h file in your Arduino libraries folder (as per the LVGL CYD tutorial)
Configured the TFT_eSPI library with the proper User_Setup.h
/*********
  ESP32 CYD ESP-NOW Receiver with LVGL Tabbed Display
  Receives data from multiple ESP32 senders and displays in tabs
  Complete project: https://RandomNerdTutorials.com/esp32-cyd-esp-now-receive-data/
*********/
#include <esp_now.h>
#include <WiFi.h>
#include <lvgl.h>
#include <TFT_eSPI.h>
#include <XPT2046_Touchscreen.h>

// Touchscreen pins
#define XPT2046_IRQ 36
#define XPT2046_MOSI 32
#define XPT2046_MISO 39
#define XPT2046_CLK 25
#define XPT2046_CS 33

SPIClass touchscreenSPI = SPIClass(VSPI);
XPT2046_Touchscreen touchscreen(XPT2046_CS, XPT2046_IRQ);

#define SCREEN_WIDTH 240
#define SCREEN_HEIGHT 320

// LVGL draw buffer
#define DRAW_BUF_SIZE (SCREEN_WIDTH * SCREEN_HEIGHT / 10 * (LV_COLOR_DEPTH / 8))
uint32_t draw_buf[DRAW_BUF_SIZE / 4];

// Data structure matching sender
typedef struct struct_message {
  int id;
  float temp;
  float hum;
  int readingId;
} struct_message;

struct_message incomingData;

// Store latest readings for each board (support up to 4 boards)
float latestTemp[4] = {0};
float latestHum[4] = {0};
int latestReadingId[4] = {0};
bool dataReceived[4] = {false};

// LVGL objects
lv_obj_t *tabview;
lv_obj_t *tabs[4];        // Tab buttons
lv_obj_t *tab_containers[4]; // Tab content containers
lv_obj_t *temp_label[4];
lv_obj_t *hum_label[4];
lv_obj_t *reading_label[4];
lv_obj_t *status_label;

void log_print(lv_log_level_t level, const char *buf) {
  LV_UNUSED(level);
  Serial.println(buf);
  Serial.flush();
}

void touchscreen_read(lv_indev_t *indev, lv_indev_data_t *data) {
  if (touchscreen.tirqTouched() && touchscreen.touched()) {
    TS_Point p = touchscreen.getPoint();
    int x = map(p.x, 200, 3700, 1, SCREEN_WIDTH);
    int y = map(p.y, 240, 3800, 1, SCREEN_HEIGHT);
    data->state = LV_INDEV_STATE_PRESSED;
    data->point.x = x;
    data->point.y = y;
  } else {
    data->state = LV_INDEV_STATE_RELEASED;
  }
}

// Callback when data is received
void OnDataRecv(const uint8_t *mac, const uint8_t *incomingData, int len) {
  memcpy(&incomingData, incomingData, sizeof(incomingData));

  int id = incomingData.id;
  if (id >= 1 && id <= 4) {
    latestTemp[id-1] = incomingData.temp;
    latestHum[id-1] = incomingData.hum;
    latestReadingId[id-1] = incomingData.readingId;
    dataReceived[id-1] = true;

    Serial.printf("Received from Board %d: Temp=%.2fC Hum=%.2f%% (Reading %d)\n",
                  id, incomingData.temp, incomingData.hum, incomingData.readingId);

    // Update the display for this board's tab
    updateTabDisplay(id-1);
  }
}

void updateTabDisplay(int boardIndex) {
  char buf[32];

  if (temp_label[boardIndex]) {
    snprintf(buf, sizeof(buf), "Temp: %.1f°C", latestTemp[boardIndex]);
    lv_label_set_text(temp_label[boardIndex], buf);
  }

  if (hum_label[boardIndex]) {
    snprintf(buf, sizeof(buf), "Humidity: %.0f%%", latestHum[boardIndex]);
    lv_label_set_text(hum_label[boardIndex], buf);
  }

  if (reading_label[boardIndex]) {
    snprintf(buf, sizeof(buf), "Reading #%d", latestReadingId[boardIndex]);
    lv_label_set_text(reading_label[boardIndex], buf);
  }
}

void create_tab_ui() {
  // Create tab view
  tabview = lv_tabview_create(lv_scr_act());

  // Add tabs for up to 4 boards
  const char *tab_names[] = {"Board 1", "Board 2", "Board 3", "Board 4"};

  for (int i = 0; i < 4; i++) {
    // Add tab
    tabs[i] = lv_tabview_add_tab(tabview, tab_names[i]);

    // Create content for this tab
    lv_obj_t *cont = tabs[i];

    // Temperature display
    temp_label[i] = lv_label_create(cont);
    lv_label_set_text(temp_label[i], "Temp: --°C");
    lv_obj_set_pos(temp_label[i], 20, 40);
    lv_obj_set_style_text_font(temp_label[i], &lv_font_montserrat_20, 0);

    // Humidity display
    hum_label[i] = lv_label_create(cont);
    lv_label_set_text(hum_label[i], "Humidity: --%");
    lv_obj_set_pos(hum_label[i], 20, 80);
    lv_obj_set_style_text_font(hum_label[i], &lv_font_montserrat_20, 0);

    // Reading ID
    reading_label[i] = lv_label_create(cont);
    lv_label_set_text(reading_label[i], "Reading #--");
    lv_obj_set_pos(reading_label[i], 20, 130);
    lv_obj_set_style_text_font(reading_label[i], &lv_font_montserrat_14, 0);

    // Status (last update)
    lv_obj_t *update_label = lv_label_create(cont);
    lv_label_set_text(update_label, dataReceived[i] ? "✓ Active" : "⏳ Waiting...");
    lv_obj_set_pos(update_label, 20, 180);
    lv_obj_set_style_text_color(update_label, dataReceived[i] ? lv_palette_main(LV_PALETTE_GREEN) : lv_palette_main(LV_PALETTE_GREY), 0);
  }
}

void setup() {
  Serial.begin(115200);
  Serial.println("ESP32 CYD ESP-NOW Receiver Starting...");

  // Initialize touchscreen
  touchscreenSPI.begin(XPT2046_CLK, XPT2046_MISO, XPT2046_MOSI, XPT2046_CS);
  touchscreen.begin(touchscreenSPI);
  touchscreen.setRotation(1);

  // Initialize LVGL
  lv_init();
  lv_log_register_print_cb(log_print);

  // Initialize display
  lv_display_t *disp = lv_tft_espi_create(SCREEN_WIDTH, SCREEN_HEIGHT, draw_buf, sizeof(draw_buf));
  lv_display_set_rotation(disp, LV_DISPLAY_ROTATION_270);

  // Initialize touch input for LVGL
  lv_indev_t *indev = lv_indev_create();
  lv_indev_set_type(indev, LV_INDEV_TYPE_POINTER);
  lv_indev_set_read_cb(indev, touchscreen_read);

  // Create the tabbed UI
  create_tab_ui();

  // Set Wi-Fi to station mode
  WiFi.mode(WIFI_STA);

  // Initialize ESP-NOW
  if (esp_now_init() != ESP_OK) {
    Serial.println("ESP-NOW init failed");
    return;
  }

  // Register receive callback
  esp_now_register_recv_cb(esp_now_recv_cb_t(OnDataRecv));

  Serial.println("ESP-NOW ready. Waiting for data...");
}

void loop() {
  lv_task_handler();
  lv_tick_inc(5);
  delay(5);
}
ESP-NOW Setup: The CYD initializes ESP-NOW and registers a receive callback function OnDataRecv() that triggers whenever data arrives.
Data Parsing: Incoming data packets are parsed into the struct_message structure, which contains board ID, temperature, humidity, and reading ID.
Tabbed UI Creation: The create_tab_ui() function builds four tabs (though we only use first two), each containing labels for temperature, humidity, and reading number.
Dynamic Updates: When new data arrives, updateTabDisplay() refreshes the labels for the corresponding board's tab.
Touch Support: The touchscreen is fully integrated—users can tap between tabs to view different boards' data.
Power all three boards (two senders + CYD receiver) via USB
Open Serial Monitor on the CYD (115200 baud) to see received data
Watch the CYD screen—within 10 seconds, you should see:
Tab 1 showing data from Board 1
Tab 2 showing data from Board 2
Data updating every 10 seconds
Touch the screen to switch between tabs
If data doesn't appear:
Verify MAC addresses in sender code
Check BME280 wiring on both senders
Ensure all boards are powered and within range (try moving closer)
| Problem | Likely Solution |
|---|---|
| No data received | Double-check CYD MAC address in sender code |
| One board's data missing | Verify BOARD_ID and wiring for that specific sender |
| Touch not working | Check touchscreen rotation setting (try 1 or 3) |
| Display shows "Waiting..." | Senders may be out of range; bring them closer |
| Compilation errors | Ensure all libraries are installed correctly (TFT_eSPI, LVGL 9.2, XPT2046_Touchscreen) |
This foundation opens up many possibilities:
Modify the code to support up to 4 boards. Simply assign BOARD_ID 3 and 4 to additional ESP32s with sensors.
The CYD has a microSD slot. Add code to log all received readings with timestamps.
Trigger an on-screen alert if temperature exceeds a threshold, or flash the RGB LED.
Use LVGL's chart widget to display temperature trends over time.
Forward received data to a web server or MQTT broker for remote monitoring.
Ready to build your wireless sensor network? Here are the parts you'll need:
ESP32 Cheap Yellow Display (CYD) – Main receiver unit
ESP32 Development Boards – For sender nodes (2 pieces)
BME280 Sensors – Temperature & humidity (2 pieces)
👉 Check all parts and best prices here
You've just built a wireless multi-sensor monitoring system using ESP-NOW and the ESP32 Cheap Yellow Display. This project demonstrates:
ESP-NOW communication for direct device-to-device data transfer
LVGL tabbed interfaces for organizing information from multiple sources
Real-time data updates on a touchscreen display
This same architecture can monitor temperatures in different rooms, track inventory levels, or collect data from remote weather stations—all displayed beautifully on your CYD.
Get your components today and start building your own wireless sensor network!
======================================
No account yet?
Create an Account