
EMC/EMI Checklist Before Your Board Goes to Certification
EMC testing is expensive, and failing it is worse than the test fee — it costs you a respin, a
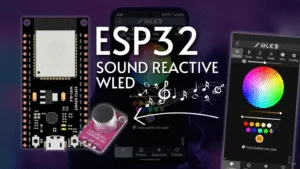
Tired of static LED displays? Transform your LED strips into a dynamic, music-driven light show that pulses, flashes, and evolves in perfect harmony with your audio. This comprehensive guide will walk you through creating a stunning sound-reactive lighting system using the powerful ESP32 board and the feature-rich WLED firmware. This project is perfect for parties, home entertainment setups, or anyone looking to add an extra dimension to their smart lighting.
Beyond simply syncing to music, this project unlocks a world of sound-reactive effects, turning audio frequencies and amplitudes into a visual spectacle.
The ESP32 is the ideal brains for this operation. Its dual-core processor handles the demanding tasks of running the WLED firmware, processing incoming audio signals, and rendering complex LED effects simultaneously without breaking a sweat. Its built-in Wi-Fi allows for wireless control and updates, a significant advantage over more basic microcontrollers.
WLED is a game-changing open-source firmware that provides a powerful and user-friendly interface for controlling addressable LEDs like WS2812B. Its native support for sound reactivity via an external microphone module means you get a plethora of pre-programmed, music-synced animations right out of the box, all configurable via a sleek web interface.
To build this audio visualizer, you will need the following components:
ESP32 Development Board: (e.g., ESP32 DevKit C or NodeMCU-32S).
Addressable LED Strip: WS2812B or SK6812 strips are highly recommended.
Microphone Module: A suitable microphone is critical for audio capture. The MAX9814 is an excellent choice for its built-in auto-gain control and low-noise amplification. Alternatives include the INMP441 (digital, I2S) for higher fidelity or the simpler LM393-based modules.
Power Supply: A robust 5V power supply capable of handling the current demands of your LED strip (e.g., 5V/5A for 150 LEDs at medium brightness).
Wiring: Jumper wires (male-to-female are handy), a USB cable for powering/programming the ESP32.
Hardware: Soldering iron, breadboard (for prototyping), and potentially a 3.3V to 5V logic level shifter for longer LED data lines.
Connecting the components correctly is crucial. The ESP32 and the microphone module operate at 3.3V logic levels, so ensure your microphone is compatible.
Wiring Overview:
Power the ESP32: Connect the Micro-USB cable to your computer or a 5V USB charger.
Power the LED Strip: Connect the 5V and GND of the LED strip directly to your external 5V power supply. Crucially, also connect the GND of the power supply to the GND pin on the ESP32 to establish a common ground.
Connect Data Line: Link the data input pin of the LED strip (usually DIN or DI) to GPIO 16 on the ESP32. For longer wires, a level shifter is advised.
Connect the Microphone:
For a MAX9814 module:
VCC → 3.3V on ESP32
GND → GND on ESP32
OUT → GPIO 36 (VP) on ESP32
Install WLED: The easiest method is using the web-based WLED installer. Visit install.wled.me from a Chrome-based browser, connect your ESP32 via USB, and follow the on-screen instructions to flash the firmware wirelessly.
Access the Interface: Once installed, connect to the "WLED-AP" Wi-Fi network. Open a browser and go to 4.3.2.1. In the settings, connect WLED to your local Wi-Fi network.
Enable Sound Reactivity: Navigate to LED Preferences -> Sound Settings.
Set Audio Input to Analog Microphone.
Set Analog Input Pin to 36.
Adjust the Sensitivity slider to calibrate the microphone's response to your environment's audio levels.
Calibration is key to impressive results. Play music at your typical listening volume and enter the Sound Reactive UI within WLED (the musical note icon).
Microphone Gain: Start with a medium sensitivity and adjust until the input meter reacts strongly to beats without constantly peaking (turning red).
Effect Parameters: Experiment with different sound-reactive effects like "Gravity Scale," "Frequencies," or "Beat+". Each effect has sliders for speed, intensity, and sensitivity. Fine-tuning these will make the visuals feel tightly integrated with the music.
Advanced Tip: For those seeking professional-grade frequency band separation, consider integrating an MSGEQ7 graphic equalizer chip between the microphone and the ESP32 to provide WLED with seven distinct audio bands for more complex effects.
No Sound Reaction: Double-check all wiring, especially the microphone connection to GPIO 36. Verify the audio input settings in WLED are correct.
Flickering or Glitchy LEDs: This is almost always a power issue. Ensure you are using a sufficient external power supply and that all ground connections are shared. Adding a large capacitor (1000µF) across the 5V and GND of the LED strip can smooth out power fluctuations.
Wi-Fi Disconnects: The ESP32 can be sensitive to power noise from large LED strips. Using a separate power supply for the ESP32 and the LEDs, connected only by a common ground, often resolves this.
You have now successfully built a powerful, customizable, and wireless sound-reactive LED system. The combination of ESP32 and WLED provides a formidable platform that is far more capable than off-the-shelf solutions. Dive deeper into the settings, create your own presets, and explore the vibrant WLED community for more ideas. From ambient room lighting to a full-blown party setup, your audio-driven light show is now ready to impress.
======================================
No account yet?
Create an Account